A few years ago we were given a secondhand (possibly third or forth hand) chest of drawers and night stand to use for Babe Jr. Once upon a time they had been cherry, but had been painted because they were dinged up or just because the family member using them previously thought white was more appropriate for her daughter's room than the original finish. She had painted the tops hot pink and the handles and knobs were brass and porcelain with flowers painted on. We kept the pink tops and swapped the hardware for some nice pink depression glass hardware ordered from ebay. The look was perfect for a little girl's room and we loved it.
When the move into a new house began to approach, Babe Jr and I discussed room decor and she decided she was getting too old for all the pink and wanted to make a change. The pieces had become even more banged up through the move and being kept in a storage unit over a period of time, and were going to need some attention anyway. I started looking for new hardware and found the perfect set for a tween/teen girl, again on ebay, that I shared here about 2 months ago.
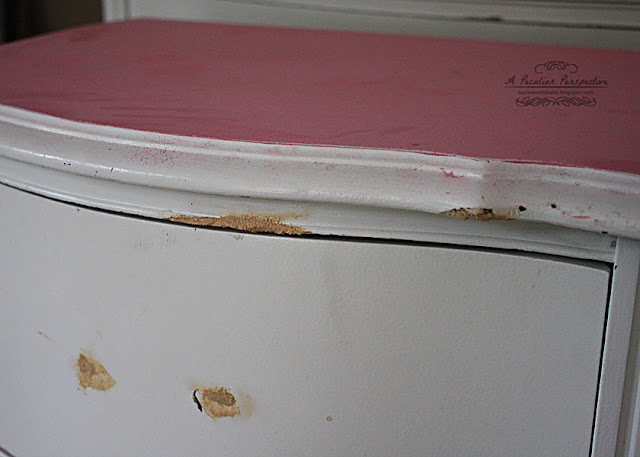
I had removed the glass handles and recycled them when I painted a mismatched set my mother in law had to use for my little niece's bedroom. The new hardware wasn't exactly the same size as the old stuff, so I had to fill the holes. This is where I learned the difference between filler and putty, then had to scrape out everything I'd filled with putty and did it over again with filler. Here the furniture is at that stage.
I made an effort to repair some other damage done through the move as well.
After letting it harden a few days, I sanded everything down and applied more filler where needed. Filler shrinks as it dries so this is almost always necessary. I removed as much of the pink as possible to make painting easier as well. Here it is all sanded down after the second application.
Its best to do this much sanding outside. I was covered in pink and white dust at this point. I would also recommend wearing a mask.
It had previously been painted using a roller, I wanted to have as clean a finish as possible so I sanded and sanded so none of the roller marks would show through. Now its nice and smooth.
I purchased some quality brushes and a semigloss paint/primer combo so that it would have a durable finish. The ideal thing to do for a professional really smooth finish would be to use spray paint, but with the amount of patching done that just wouldn't have been a thick enough coat to cover all the damage. I tried to find a conditioner for latex paint that I've read about to extend dry time and cut down brush marks, but once again due to my rural area and limited shopping choices, no one carried it. Oil based paint would give the same effect without conditioner, but it is so much messier and smelly, so I kept to my choice of latex.
I used a small artist paint brush to get in the grooves along the corners and skirting on the bottom. After a few careful coats of fresh paint, and the new blingy hardware installed, the big reveal!
I couldn't be more pleased. They look brand new and are going to be awesome with the decor Babe Jr has chosen once we get her room organized and all put together.
She's going to have the chicest room in town. Of course I'll post about that once its all together as well.
Thanks for looking!


All your hard work paid off. You did a fantastic job. I love em!
ReplyDeleteWhat a really really nice job of re-painting those pieces. The paint looks so lovely and smooth, and the new hardware, er, bling, is gorgeous. So classy!
ReplyDeleteI really appreciate the pix that show the steps you took!
Wow! You did a fantastic job! It takes a lot of patience to fill holes, sand and repeat, over and over and over again! I'm sure your daughter is thrilled!
ReplyDeleteAmazing job! I love seeing the before and after!
ReplyDeleteAmazing job! I love the handles!
ReplyDelete